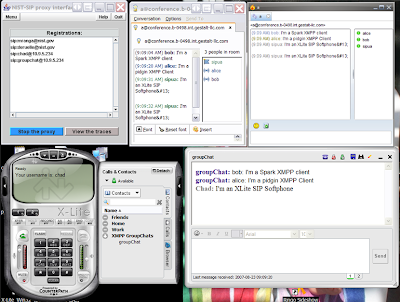
As noted in one of my earlier blogs, we have been enhancing the XMPP BC to be able to participate in Group Chat Sessions. During this process we thought we would also show how you can utilize JBI to be a convergent platform and bridge gaps across protocols. To do this, we thought we would show how a SIP User Agent (e.g. an xlite soft phone) could participate in an XMPP Group Chat session. Brian O'Neill's blog talks a little more about utilizing JBI as a convergent communication platform, and provides a use case here.
Enough with the fluff, on with the demo. I've uploaded the Netbeans Projects here that I will be discussing in this blog so you don’t have to create them from scratch. Below is a list of prerequisetes in order to run the demo:
- You will need to get the latest OpenESB installer
o This comes with Netbeans, Glassfish, and the JBI Components you will need to run the demo.
- Set up an Openfire XMPP Server
o You can go here for a demo on how to setup Openfire
o You will need to get an XMPP client (e.g. Spark or Pidgin)
§ You can go here to see a demo of how to setup Spark
§ You will need to create one user in Openfire with the username sipua and password sipua (This is defined in the XMPP WSLDs
- Set up a SIP User Agent/SIP Server
o We used XLite for the demo, but you should be able to utilize just about any SIP UA and SIP Server.
o Login as a user (e.g. chad)
- Edit the XMPP WSDL
o Edit all xmpp WSDLs to reflect the correct domain (the domain of your Openfire server) and the correct groupChat name (e.g. A@conference.OpenFireDomain). Both attributes can be found in the xmpp:address section of the WSDL.
- Edit the SIP WSDL
o Edit all sip WSDLs to reflect the correct proxyDomain (sip:address section of the wsdl) (the domain of your SIP server)
- Edit the BPEL Process
o Click on Assign3 and edit the String A@conference.b-0498.int.gestalt-llc.com to be the groupChat name you defined in your XMPP WSDL’s earlier.
o Click on Assign1 and edit the String chad@10.9.5.62 to be whatever user you are logged in as (e.g. mySipUserAgent@mySipServerDomain).
You should be all set now. You will need to recompile the Composite Application by right clicking (in Netbeans) on SIPAndXMPPCA module and selecting “Clean and Build”. You are now ready to deploy your application. Follow the following steps to deploy and run the test.
- Start Glassfish
o In Netbeans Click Window à Services à Servers à Right click on Sun Java Application Server à Click Start.
- Start Openfire
o With an XMPP client (e.g. Spark or Pidgin (or Both)) log in, you may have to create an account first.
- Start SIP Server and SIP User Agent
o Using a SIP UA (e.g. XLite) log in as the user you defined in the Bpel Process above (e.g. chad@10.9.5.65).
- Ensure JBI Components are installed and started
o In Netbeans navigate to Window à Services à Sun Java System Application Server 9 à JBI
§ Under Service Engines verify the following Component is installed and started
· sun-bpel-engine
§ Under Binding Components verify the following Component is installed and started
· gestalt-sip-binding
· gestalt-xmpp-binding (uninstall this component by right clicking on the component and selecting "uninstall". We need to ensure you have the latest XMPP BC, you can find it here. Download the xmppbc.jar and install it by righ clicking on Binding Components and selecting Install New Binding Component. After Installation, make sure you start the XMPP BC (Right click and select Start).
o If the components are not there, you can download them here.
- Deploy the SIPAndXMPPCA by right clicking on the project and selecting “Deploy Project”
- Once deployed, you should be able to use your Spark or Pidgin clients and join the Conference room that was created (e.g. A). You should see yourself in the room as well as the user sipua. You can now send a message to the group and your SIP UA will receive the message. Have your SIP UA respond and see the message appear in the Group Chat.
So a quick recap of what we accomplished. First, we were able to create an application that could bridge two protocols that normally couldn’t speak to each other (See screenshot below). Second, we did this without writing one line of code. Yes, you read that correct. To do this application from scratch all you have to do is configure it, and then tell BPEL how to orchestrate it. Netbeans provides a nice way to do this with their toolkit support (automatically generating WSDL’s and leveraging the design view for the BPEL process to drag and drop activities on the screen)

If you have any questions feel free to shoot us an email by using our mailing lists (


No comments:
Post a Comment